We use some essential cookies to make this website work. We'd like to use some additional cookies and tracking technology to understand, improve and personalise your experience of this site. Some of these are set by third parties.
Updating your Strategy Scorecard on a regular basis is vital to staying on top of your strategy execution, knowing whether it is producing the intended outcomes or not, and adjusting it as necessary.
But it can be a bit of an administrative burden.
And who wouldn't rather be adding value than doing admin?
StratNav's APIs provide an easy way to connect your source systems to your Strategy Scorecard without you needing to update it manually yourself.
And tools like Zapier make it even easier to achieve this.
In this post, we will look at how to use Zapier to add a new KPI measurement to your scorecard.
Of course, that is not the only thing you can automate using StratNav's API and/or Zapier, but it is a very common and useful example.
What is Zapier?
Zapier is a robust online automation tool that streamlines the integration of various web applications, enabling businesses to enhance productivity and operational efficiency without the need for complex coding knowledge. It operates by creating automated workflows, known as Zaps, which trigger actions across different apps based on specific events.
Setting up your Zap
What you will need
You will need:
A Zapier account on the Starter Plan or higher (see below)
A StratNav account on the Enterprise plan, and which includes at least one project with at least one KPI.
The ClientID and Secret to access the API for your project.
To create and/or find the ClientID and Secret to access the API for your project:
Click on the Project Menu (the name of your project) toward the top (it's the second item) of the main menu.
Follow the onscreen instructions.
The ID of your project and the ID of the Performance Indicator (KPI) you want to update.
To get to the ID of your project and the KPI you want to update:
Open the edit screen for the Performance Indicator.
Your browser's URL bar should show a URL which looks something like this (colours added for emphasis) https://www.stratnavapp.com/Projects/10a573de-4990-4cb6-9c2a-9db3936198d1/PerformanceIndicators/78e02267-e03b-4be1-b050-812c26237b13
The ID of your project is the portion shown in Green.
The ID of your Performance Indicator (KPI) is the portion shown in Purple.
NB: The IDs shown above are given as examples only. Your own IDs will be different for each project and each Performance Indicator.
Setting up your trigger and input data
There are lots of triggers you can use in Zapier, and lots of utilities you can use to process. The Zapier website provides extensive documentation.
For the purposes of this example, we will use the simple (and surprisingly common case) where the data for your KPI is sent to you by email.
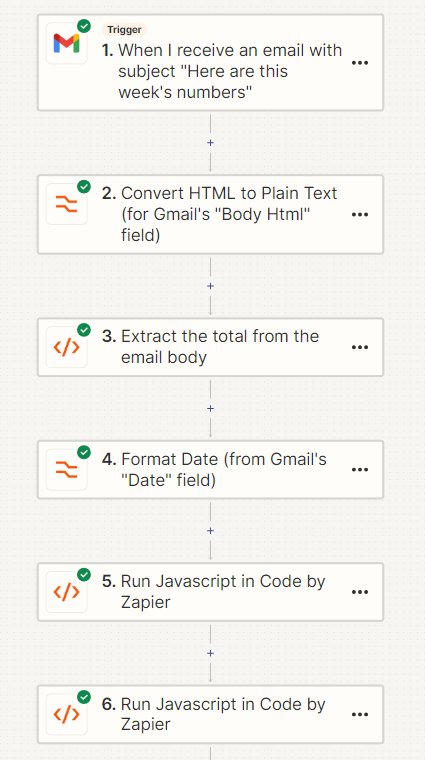
In the Zap illustrated in the diagram to the right/above, the first 4 steps of the Zap show:
The Zap is triggered when you receive an email with the subject "Here are this weeks numbers". (You can, of course, use more sophisticated filtering to identify the emails that are relevant.)
The body of the email is converted from HTML to plain text (to make it easier to process).
The KPI value is extracted from the converted body of the email.
The Send Date is also extracted from the email. (Note that you must convert the date to yyyy-MM-dd format. Zapier has a number of utilities for formatting data, including dates.)
NB: These 4 steps are nothing to do with StratNav. You could use Zapier to create any number of triggers and extract the data you want in any number of ways.
Submitting to StratNav
There are two ways to submit your KPI from Zapier to StratNav:
Using StratNav's native Zapier integration
Writing directly to the API
Using StratNav's native Zapier integration
This is the easiest way to submit your KPI to StratNav from Zapier.
Create a new Zap or select an existing Zap in Zapier.
Create a new step in Zapier.
Select "StratNav" as the service. Zapier will take you through an authentication process the first time you do this.
Enter the Project ID and Performance Indicator ID from the earlier step.
Enter the Value, Date (Optional) and Commentary (Optional) you want to add.
Test and Publish.
Important: Our Zapier integration is currently available on an invitation-only basis. Click here to accept your invitation (opens in new tab).
Tips: You can use all the power of Zapier to access other applications' or Zapier's own in-built applications. For example, we frequently use "Format from Zapier" to convert dates from other applications into the in-built YYYY-MM-DD format used in StratNav's integration.
Writing directly to the API
This is a slightly more complex method and is provided for legacy reasons (i.e. for people who linked Zapier to StratNav before we developed the method above.
There are two steps to complete:
Authenticate with StratNav
Submit your Measurement
Authenticate with StratNav
The next step (number 4 on the diagram) is to authenticate with StratNav. This involves sending your ClientID and Secret (refer to the instructions above) to StratNav, after which StratNav will authenticate you and return a token.
To do this, you will add a "Run Javascript in Code by Zapier" step to your Zap and paste the following into the "Code" field:
const options = {
method: 'POST',
url: 'https://www.stratnavapp.com/oauth/token',
headers: {'content-type': 'application/json'},
body: JSON.stringify({
client_id: 'YOUR_CLIENT_ID',
client_secret: 'YOUR_SECRET',
audience: 'https://api.stratnavapp.com',
grant_type: 'client_credentials'
})
};
fetch(options.url, {
method: options.method,
headers: options.headers,
body: options.body
}) .then(response => response.json())
.then(data => {
const accessToken = data.access_token;
var output = {token: accessToken};
callback(null, output);
})
.catch(callback);
NB: You must replace YOUR_CLIENT_ID and YOUR_SECRET with your ClientID and Secret from the earlier step.
Submit your Measurement
The next (and final) step is to submit your Measurement to the API. This is step 6 in the diagram.
To do this, you will:
Add another "Run Javascript in Code by Zapier" step to your Zap.
Complete the "Input Data" fields. You will need to add 3:
"token" - the Token returned from step 5 (the authentication step)
"date" - the date returned from step 4
"amount" - the value returned from step 3. (Note: that "date" and "token" will come from whichever steps you've defined for your use case, which may be different to the example outlined above.)
NB: You must replace YOUR_PROJECT_ID and YOUR_PERFORMANCE_INDICATOR_ID with your Project ID and Performance Indicator ID from the earlier step.
You can also change the "Added by Zapier" commentary to something else (whatever you prefer) or just leave it blank ("").
Publish your Zap
That's it. All that remains is for you to click Publish to publish your Zap and it will automatically update the KPI on your Strategy Scorecard as instructed.
(Zapier does provide facilities to test your Zap before you publish it, and we recommend that you do so.)
Restrictions
Note that you will need:
An Enterprise license on StratNav in order to access the APIs. See Payment Plans.
A Starter plan (or higher) on Zapier in order to create multi-step Zaps and use Zapier data tools. See Pricing.
What is the purpose of integrating Zapier with StratNavApp.com?
Integrating Zapier with StratNavApp.com helps automate the process of updating KPI measurements in your Strategy Scorecard, reducing manual administrative effort and ensuring your strategy execution data is kept up to date automatically.
What is Zapier?
Zapier is an online automation tool that allows you to create automated workflows (called Zaps) between different web applications, enabling tasks such as triggering actions and moving data without coding.
What do I need to set up a Zap to automate KPI updates?
To set up a Zap for KPI updates you need: (1) a Zapier account on the Starter Plan or higher; (2) a StratNavApp.com Enterprise account with at least one project and KPI; (3) the ClientID and Secret for API access; and (4) the project and KPI IDs you wish to update.
How does the Zap workflow for adding KPI measurements work?
In a typical Zap workflow, you create a trigger (for example, receiving an email), extract KPI data and dates using Zapier utilities, authenticate with StratNavApp.com via its API, and submit the KPI measurement automatically via a code step that posts the data to the correct KPI endpoint.
How do I authenticate Zapier with StratNavApp.com’s API?
Authentication involves sending your StratNavApp.com ClientID and Secret to the authentication endpoint to receive an access token, which is then used in subsequent API requests to submit KPI measurements.
What restrictions should I be aware of when automating KPI updates with Zapier?
You must have an Enterprise subscription on StratNavApp.com to access the API, and a Zapier plan that supports multi-step Zaps and data utilities, such as the Starter Plan or higher.
Can I test a Zap before publishing it to update KPI measurements?
Yes — Zapier provides testing facilities that allow you to verify your Zap’s workflow and ensure it updates the KPI correctly before you publish it into production.
About the author
Chris C Fox is an independent business strategy consultant and founder of StratNav. He helps consultants scale their impact, supports C-suite leaders in executing enterprise-wide strategies, and equips founders to grow and adapt with confidence.
👉 Learn more about Chris and his work.
👉 Book a strategy call or try StratNav for free.
Share this on:
LinkedInTwitterFacebookEmail
Every time you share anything about StratNav with someone else, you help them to develop and execute better business strategies, and you help to support us and our ability to continue to make the platform even better for you. So it really is a win-win!